Iguana – How to
1 Introduction
This document provides step-by-step examples for setting up various components of an Iguana site.
They are an addition to the generic documentation, which provides information on all the aspects of the Iguana CMS. In this document we attempt to give you information for specific scenario's – pulling together all the parts of the Iguana CMS you would need to create a specific feature or function.
The Iguana system as delivered to a new customer comprises a copy of the default profile with a copy of the default navigation.
There is a home page, a search page and a user activities page linked by the navigation.
We create an initial CMS user for the customer and use it for what follows.
To exercise the CMS we create a few content items, and place them on the home page.
We upload a banner image and place that on the profile header.
We verify that searching the catalogue is functional, and that login with a library borrower's barcode and PIN works as expected and displays loans and so on.
Finally we attempt to verify the web server's ability to initiate calls to other sites on the web to bring back data for mashups, in particular, animations and RSS feeds.
But of course you can change and adjust all this to suit your own needs and requirements.
The appearance of an Iguana page for an end user is determined by a number of characteristics. These are, in order of importance for a new system:
Profiles
These contain a header and a footer and optionally some other elements which can be used on all pages, or on a group of pages.
Pages (views)
The page is an aggregation of content of various types, which may be static or dynamic in nature.
Applications (widgets)
These are units of content which the end user might be interested in reading (text/images), or actions they might want to pursue (e.g. login).
Navigation
A navigation structure determines how the user goes from one page to another.
Themes
These comprise a structure of cascading style sheets and images which can be applied to a set of pages.
Short URLs
Basically a shorthand way of referring to a page.
These entities are managed by the Iguana Content Management System (CMS).
More details of each of these parts of Iguana are given below.
1.1 Profiles
A profile can be thought of more or less as a website.
It's quite possible to build a site with just the default profile. However, in training we usually define a number of profiles to allow people to create, modify and delete content and presentation – to experiment – without impacting others.
A profile has header and footer sections which may contain text, images or navigation menus to appear on every page.
A profile may have a banner image or an animation (a book river usually) to appear on every page.
A profile usually has a main navigation to appear on every page: this appears as a bar beneath the banner or animation.
A profile may be associated with a theme for a set of pages.
You inherit a default profile from the installation: DO NOT delete this profile, even if you are not going to use it, since the software relies on it for certain functions.
1.2 Pages (or Views)
A page may contain a banner image or an animation: you might want different banners for the different pages of your site.
A page is normally divided into 3 columns in which you place your content, though there are other options available and you can determine the widths exactly. You can also have a full width element, above or below your column layout.
A page may be displayed in more than 1 profile: what is shown is a combination of the profile and the page as explained above. The page is re-usable in other words. So, strictly speaking, the "page" which the end user sees is the combination of attributes of the Iguana Profile and those of the Iguana Page or View.
You inherit a number of default pages from the installation: DO NOT delete these pages.
1.3 Applications (or widgets)
Widgets are units of content, including
· rich text items (RTI)
· animations
· published content containers
· RSS items
· direct search items
· word clouds
· login widgets
· search widgets
· mashups
· other foreign content in an iFrame
· forms
These are managed with the individual options in the CMS.
The rich text editor included with the CMS allows the usual text management functions in addition to handling images, links and iFrames.
The media manager included with the CMS allows the user to upload images and other multimedia files to the server (web server if distinct) for use in widgets (or other content).
You may end up with a large number of widgets! The CMS provides a directory structure ("tree structure") to help in organizing these.
1.4 Navigation
The "main navigation" defines a structure of linked pages.
Typically the navigation directs you to other Iguana pages, but it can also point at external pages, or system functions (e.g. Login, or ChangeFontSize).
The navigation is constant for the profile.
The navigation is intimately linked to some predefined CSS styles which determine its presentation.
It is also possible to have a "header navigation" where typically the login or change font size options are used.
You inherit a number of default navigation entities from the installation: DO NOT delete these navigations.
1.5 Themes
The Iguana web server contains sets of CSS files and images organized into themes. You can choose a theme or create one of your own if you have the expertise, but you should note that Infor supplied CSS files may be overwritten on an upgrade.
Infor advises that the initial effort with a new installation be put into the content creation and organization using the CMS.
1.6 Short URL
A short URL is a shorthand way of referring to a page to be displayed in a particular way: for example, to display page A using profile B, and theme C, could be shortened to the syntax surl=ABC. The construction of short URLs is not as simple as this however!
These are useful in navigation entries, and particularly useful in the development stage of a new system.
You inherit a number of default short URLs from the installation: DO NOT delete these short URLs.
2 How to create a profile
This section explains the steps required for setting up a profile.
Sequence of steps
On the main screen of the CMS, choose Pages & Profiles, then choose Site Profiles.
Note
Do NOT delete the default profile created by the installation:
![]()
Click the button.
In Basic Settings, give the profile an Identifier, that will be displayed in the list in the CMS (the end user will not see it).
In Basic Settings, give the profile a Page Title, that will be displayed in the end user's browser (for example on the tab in Firefox or IE8 or 9) – NB This is replaced by the Page Title of the displayed page, if it has one.
In the Header, you have the Rich Text Editor to create and format the text you wish to appear on all pages. NB If you are using the default theme (with the grey border) you will need to precede the text with 1 or more blank lines to move it out of the grey area.
In the Header, you can add your header navigation if you have one. Separate the text and the navigation with 1 or more blank lines to avoid the styles becoming confused: you can click the button (top left of the ckeditor button bar) if the end result indicated this may be happening.
In the Profile Sections, add your main navigation.
the profile.
Click : you won't be able to display the profile until you have done this.
The profile is ready for use.
See below for Using the Profile.
Optional features
In Basic Settings, add a favicon to display alongside the page title in the end user's browser. The Search button opens a Media Manager window, which allows you to browse available images saved on the server and also to upload images from your PC and from there to select them for use.
In Advanced Settings, add a banner image which will display every time the profile is invoked. The Search button again allows you to choose or upload an image as above.
You do not need to create a footer (although you can of course). The default text "Powered by Iguana (v2.0)" is always displayed at the bottom of the page.
In Basic Metatag Settings, add keywords for site search.
Using the profile
You can't see the profile on its own in any really meaningful way. It's better to skip this until you have also created a page, and to look at the page "in" the profile.
Normally you will want to specify a page to be used along with the profile: see the chapter on short URLs for this.
3 How to create a page
This section explains the steps required for setting up a page.
Sequence of steps
On the main screen of the CMS, choose Pages & Profiles, then choose Pages.
Note
Do NOT delete the default page created by the installation:

Click the button.
In Basic Settings, give the page an identifier, that will be displayed in the list in the CMS (the end user will not see it).
In Basic Settings, give the page a Page Title, that will be displayed in the end user's browser (for example on the tab in Firefox or IE8 or 9) – NB This replaces the Page Title of the profile in use, if it has one.
the page.
Click : you won't be able to see the page until you have done this.
The page is ready for use.
Optional features
In Basic Settings, choose a banner image or an animation to be displayed: The Search button for banners opens a Media Manager window, which allows you to browse available images saved on the server and also to upload images from your PC and from there to select them for use as a banner. The Search button for animations allows you to choose from animations created in the Iguana CMS. You cannot have both banner and animation. Alternatively, you can elect to display whatever is defined in the profile.
In Basic Metatag Settings, add keywords for site search.
In Layout settings, choose a different layout, if you do not want the default layout of 3 equal sized columns.
Adding content to the page
In Update Content & Content Preview, click .
In the tree structure that is displayed, navigate to the place your content is saved in and click on the item – you have access to all the types of content here: Rich Text items, RSS, Search, Login, Animations (listed as Featured Items) and Published Content.
Click .
In the message window, click .
In Update Content & Content Preview, click .
If you want to see a preview of the page, make sure you choose the profile you want, as the default profile is used by default.
At the top of the screen, click .
4 How to create a short URL
The short URL is a way of addressing a combination of a site profile and a page (view) – although other components can also be specified.
Decide the name (or code) that you want your short URL to have, and identify the page and profile that the short URL should point to.
Sequence of steps
On the main screen of the CMS, choose Pages & Profiles, then choose Pages.
Click on the title of the page you wish to use.
Expand the Advanced Settings if they are not visible and look for the Unique ID.
Copy the 32-character string into a Notepad window and precede it with the characters "&v=" (not including the quotes), so, looking like this:
&v=7e84692e-77f6-11e1-bb7b-03ba8d558d00
Click to exit from the page: if you are prompted to save changes, exit without saving.
Now choose Profiles.
Click on the title of the profile you wish to use.
Expand the Advanced Settings if they are not visible and look for the Unique ID.
Copy the 32-character string into a Notepad window and precede it with the characters "?p=" (not including the quotes), so, looking like this:
?p=417453b6-79c5-11e1-b263-03ba8d558d00
Click to exit from the profile: if you are prompted to save changes, exit without saving.
In the Notepad window, concatenate these 2 strings, making sure that the one with the question mark comes first, so looking like this:
?p=417453b6-79c5-11e1-b263-03ba8d558d00&v=7e84692e-77f6-11e1-bb7b-03ba8d558d00
Now choose Short URLs.
Note
Do NOT delete the default short URLs created by the installation:

Click the button.
In the ID box, enter the name you chose for the short URL.
In the URL box, type "www.main.cls" (without the quotes) and paste the concatenated string from your notepad window at the end, so looking like this:
www.main.cls?p=417453b6-79c5-11e1-b263-03ba8d558d00&v=7e84692e-77f6-11e1-bb7b-03ba8d558d00
Check the box Keep Short URL.
Click .
There is no Validate for Production stage here.
Options
To specify the theme to be used, use
&theme=flandersblue (for example)
Or for the language
&language=eng
Add these in to the URL box referred to above.
Using the Short URL
Remember that the default entry page for Iguana is called using
www.main.cls
for example
http://essex.gov.uk/iguana/www.main.cls
We simply use this and specify the Short URL as a parameter called "surl", for example
http://essex.gov.uk/iguana/www.main.cls?surl=rules
(supposing you have created a page with the library rules, for example).
5 How to create a navigation structure
This section explains the steps required for setting up navigation.
Sequence of steps
On the main screen of the CMS, choose Pages & Profiles, then choose Navigation.
Note
Do NOT delete the default navigation created by the installation:
![]()
Click the button.
In Basic Settings, give the navigation a label, which will be displayed in the list in the CMS (the end user will not see it). It is useful to distinguish Main Navigations and Header Navigations (if used).
In Basic Settings, right click on the little folder icon and then click on Add Submenu or Add Item as required.
For Add Submenu, a new folder is displayed: you can then right click on this to add items or more submenus just as you did on the top level folder.
For Add Item, a new item is displayed: click on this and a properties page opens up.
Your item may point to an Iguana page defined by choosing a profile and page, or to a short URL you have already defined, or to an external link.
System options (login or logout for example) are more often used in Header Navigations.
You can check the box to determine that the target should open in a new window if desired.
In Header Navigations the option to specify whether users must be logged in to see certain items is often used.
Finally, do not forget to enter the label for the navigation item.
Click for the navigation item.
Click for the Navigation itself, and click .
The navigation is now available for use.
Using the navigation
On the main screen of the CMS, Choose Pages and Profiles, and then choose Site Profiles.
Click on the title of the profile where you want to use the navigation.
If this is a Main Navigation, expand the Profile Sections section if it is not already expanded, and you will see a navigation section below the header, with a pen icon to the right: click on this.
The list of the defined navigations is shown: click the one you wish to use.
Click .
Click .
Click to save the profile with the navigation included, and (if this was not done earlier).
If this is a Header Navigation, expand the Header section if it is not already expanded.
Click the navigation icon which is a fat blue arrow pointing up (3rd icon from the end).
From the drop down list of defined navigations, choose the one you wish to use and click .
Click to save the profile with the navigation included, and (if this was not done earlier).
The navigation is now ready for use in the specified profile.
Note
The navigation entities can be used elsewhere: the above are the 2 most common uses of a navigation.
6 How to create a rich text widget
Rich Text Widgets or Rich Text Items (RTIs) are the backbone of the Iguana page, and the techniques available here are used in many other parts of the system: the rich text editor, the media manager and the tree storage in particular.
Sequence of steps
On the main screen of the CMS, choose Content-Applications, then choose Rich Text Items.
Click the button.
In Basic Settings, give the item a title to display on the Iguana page.
In Basic Settings, Tree Storage, enter the folder/structure in which you want to save the item. The name of the top level folder goes in 1, the next level folder in 2, and so on. Remember, the RTI will be placed in the RTI folder, at the very top level by default, and you are naming the levels below this, so you don't need to create a folder called Rich Text Items in other words. Infor strongly recommends defining a naming convention for these folders before you start.
In Content, enter the text of the item, along with any other things like images, links and so on. The full functionality of the Rich Text Editor ("ckeditor") is available here – this is described fully in section 5 of the Iguana documentation.
If you paste text from another document into the rich text editor window, Infor strongly recommends you use plain text format and use the editor to do the formatting.
If you click Image or Flash, the Media Manager is invoked to allow you to browse images or other files saved in the Uploads area on the server, and to browse images stored on your local PC and upload them to the server. This is described fully in section 7 of the Iguana documentation.
If you add an image to the item, Infor strongly recommends you upload it with an appropriate size, as you have better control over the end result.
Click , then .
Optional Features
In Summary, enter the text of a summary to be displayed initially: this is displayed with a link to display the full content if desired). Again the rich text editor and the media manager are available to format the summary.
In Permissions and Restrictions, set a date range for when the item should be displayed.
In Permissions and Restrictions, set the flag to determine whether the item should only be displayed to logged in users.
Using the RTI
You need to put the item on a page for users to see it. Please refer to Chapter 3 (Pages) for more information on how to do this.
7 How to use Published content
Published content is "a basic framework for the periodical publishing of items". It's helpful to think of them as news items, which have a relation to dates, i.e. they may be announcements of upcoming events (which you do not want to display after the event has taken place), or reports of something (which after a period become "old news" and again you do not want to show them).
The idea is that you display a list of items, maybe with a calendar display, and you can click an item in the list to display more information – this may be on the same page, or on a new page. The original list has minimal detail for each item so it is as compact as possible.
7.1 General explanation
There are 3 types of entities:
· content containers
· content items
· content types
What you need then are:
· one or more content types, say, football news, rugby news
· a content container defined to contain these types of items – the items are added to the container automatically
· some items of news to which you assign the created types:
- they may have thumbnail images associated;
- they may have dates associated;
- they may themselves be widgets which already exist
· a placeholder to receive the content item, on the same page or on another page – this is also referred to as a container
The content container entities in the CMS are overview containers. You do not define placeholders, just add them to your page.
When you add the placeholder to your page, you have to choose "New Application" – although of course it exists already.
There is a display definition for the list of items in the container, for example, to show a calendar or not, and there is also a display definition for the items themselves. However, the destination container where the single item is shown does not have any display properties at all (it is inherited from the content item).
Containers are applications. However, content items can be applications (widgets) loaded in, as well as content items created from scratch.
You can also do inline editing of your content items, if necessary.
7.2 Create a published content structure
A content container can automatically display summary content items with specified content types, and these items can be expanded into a placeholder on the same Iguana page or a completely different one.
Sequence of steps
1. Define the content types
On the main screen of the CMS, choose Publisher, then choose Content Types.
Click the button.
In Basic Settings, give the content type a title: this is just a label or name, e.g. Football, which will be used to sort items into containers – types have no intrinsic properties associated with them.
Click the button.
The content type is ready for use.
2. Create a content container
On the main screen of the CMS, choose Publisher, then Content Containers.
Click the button.
In Basic Settings, move the desired content type(s) to the right hand side by highlighting them and then clicking the > button.
A new line appears for each content type. For each one, setup the profile/page combination where you want the expanded content to be displayed. This might be the same page as where you display the list of items, or a completely different page.
In Basic Settings, give the container a Title which will be displayed in Iguana page (it's *not* an internal ID).
Click the button.
Click .
The container is now ready for use.
Optional features:
In Display Settings, you have a choice of templates and a number of other features to govern how the container and the individual items are displayed: examples of this are in section 6 of the supplied documentation. For example, depending on the nature of the content, you can elect for a template with thumbnail images, or with a calendar shown.
In Preview, you can see the list of items (at this stage you have not added any of course), but the display is not the same as the final Iguana page.
3. Create content items
On the main screen of the CMS, choose Publisher, then Content Items.
Click the button.
In Basic Settings, specify in Tree Storage the folder where the container will be located (see chapter 6 for details on tree storage).
In Basic Settings, select the content type for the item from the drop down list of defined content types.
In Basic Settings, add a thumbnail image if desired.
In Basic Settings, give the item a title which will be displayed on the Iguana page.
You have the Rich Text Editor to create both the summary text in the Summary section and the full text in the Content Settings section. See chapter 6 for further details if needed.
Click the button.
The content item is now ready for use: it is automatically associated with any container carrying items of this type, you do not have to add it to a container.
Optional features:
In Advanced Settings, add the date information about the item: when the item dates (dates of a festival, say) are, and when you want to display the item, usually earlier than the day it starts!
In Advanced Settings, add tags to the item for the site search.
4. Add the content container to a page
On the main screen of the CMS, choose Pages & Profiles, then Pages.
Click on the name of the page where you want the container (list of items) to appear.
In Update Content & Content Preview, click Add Existing Application.
In the tree structure displayed, navigate to the list of content containers, and click on the one you wish to use.
Click the button.
In the confirmation window, click . The container is added to the page.
If you wish to preview the appearance of the page, make sure you choose the desired profile.
If you wish to put the container in a different location on the page, you can drag it to the new location in this preview window.
In Update Content & Content Preview, click . Click .
At the top of the page, click .
The container is located on the page.
5. Set up placeholder(s) for expanded content
On the main screen of the CMS, choose Pages & Profiles, then Pages.
Click on the name of any page where you want expanded content to appear: this might be the same page as the list of items, or a completely different page. The actual page that is used is defined in Step 2 above.
In Update Content & Content Preview, click .
In the next window, click .
Click the button.
In the confirmation window, click . The placeholder is added to the page.
Click . Click .
At the top of the page, click .
The placeholder is now ready for use.
Note
To enable use of this functionality, the following system parameters must also be set under Parameters – Parameter setup – Publisher (advanced):
Show comments: If set, display comments for published content items.
Allow new comments: If set, allow new comments to be added for published content items.
Order of comments: Order in which comments should be displayed, chronological or most recent first.
Blacklisted words: Words in this list will be removed from comments entered by users.
Publish comment: This determines when to publish a comment; choices are: immediately/always, always moderate first, or publish immediately if it is not changed by the blacklist otherwise moderate first.
8 Guidelines for using and modifying style sheets
Although Iguana's CMS includes definitions of a large number of presentational elements, it may be that you reach the limit of these capabilities at some stage, in other words, there are some changes you find you cannot make with the CMS alone.
The cascading style sheets supplied with Iguana can be used to further modify the presentation of the Iguana pages.
This chapter is a brief statement of Infor practice and the standards of practice expected on the customers' systems.
|
|
Infor may overwrite the default style sheet files on the occasion of an upgrade, or, indeed, at any time, for support purposes. |
|
|
Therefore, do not edit a supplied style sheet file – create a new one of your own. |
|
|
The files you should not edit are ALL THE FILES SUPPLIED under the css/themes directory (see screenshot below for illustration). |
Iguana is built on the concept of themes, and normally we expect the customer to follow a theme for a set of web pages.
However, it is possible to simply create a CSS file and apply it to one page or a number of pages individually.
Infor's preference is for the creation of a new theme.
8.1 How to create a new theme
It is assumed that the customer has access to the file system on the server where the files reside – this may be a separate web server or it may be that everything resides on a single server.
1. Navigate to the iguana directory and then to the subdirectory CSS/css/themes, for example
M:\newinfor\iguana\CSS\css\themes

2. Each directory under "themes" represents a theme with that name. Create a new directory at this level with the name of your new theme, say "custom".
3. Create a file in the directory with the name of your new theme, say, "custom.css".
4. Set the first lines in the file to include the base css file of the theme from which you are deriving your new theme, for example, if you were basing your theme on the base theme, you would open the file with
@import url("../base/base.css");
Or, if you were basing your theme on the highcontrast theme, you would open the file with
@import url("../highcontrast/highcontrast.css");
Of course you could copy a complete base css file from another theme, but this approach gives the best compatibility with changes to the Infor supplied base style sheets.
5. Make your changes in this file, and add comments to indicate the purpose of the change. See the Iguana documentation for examples.
6. In testing, simply add the parameter Theme=custom to the Iguana URL. (This persists for the session unless you revert to the default theme explicitly.)
7. Set the site to use the theme by configuring this in the advanced properties of the site profile in the CMS.
8. Changes to the font size can be difficult to keep consistent and are best kept in a separate style sheet from other changes. The recommendation is to link to this file from within your main style sheet:
@import url("fontsizes.css");
If you do not create a theme
Infor suggests you locate your CSS files in the same structure, i.e. the themes subdirectory, and name them appropriately.
This is of course not the only way to handle style sheets. It may be that a different way to proceed suits your specific circumstances better. Whatever choice you make, be sure to be consistent with the principles in this document, and record your changes.
9 How to create an RSS feed widget
This section explains the steps required for defining an RSS feed widget.
Note
The Iguana web server needs to be able to initiate a call to the website of the RSS feed in order to create this type of mashup. (An external call, usually.)
Sequence of steps
First identify the desired RSS feed: use your browser to navigate to the web page where the RSS items are displayed. Copy the URL in the browser address bar to your notepad window.
On the main screen of the CMS, choose Content - Applications, then choose RSS.
Click the button.
In Basic Settings, paste the URL you have just copied into the first field.
In Basic Settings, set the Show Summary and Number of Items parameters to your desired values, if you do not want the defaults.
In Basic Settings, Tree Storage, enter the folder/structure in which you want to save the item. The name of the top level folder goes in 1, the next level folder in 2, and so on. Remember, the widget will be placed in the RSS folder, at the very top level by default, and you are naming the levels below this, so you don't need to create a folder called RSS in other words. Infor strongly recommends defining a naming convention for these folders before you start.
In Basic Settings, give the item a title to display on the Iguana page.
Click , then .
The RSS Feed should appear in the preview section. If it does not, it is probably because the web server setup described above is not implemented correctly. You can attempt to use the URL whilst logged in to the web server's desktop, if you have the appropriate permissions: you may be able to see a firewall blocking the call, or a DNS error for the address.
Optional Features
In Permissions and Restrictions, set a date range for when the item should be displayed.
In Permissions and Restrictions, set the flag to determine whether the item should only be displayed to logged in users.
Using the widget
You need to put the item on a page for users to see it. Please refer to Chapter 3 (Pages) for more information on how to do this.
10 Google maps location mashup
This section contains information on how to define a mashup for Google map locations.
1. First define the locations
· Go to General & Tools – Locations – Location definition and select the desired location from the drop down list
· Add some geographical information such as the postcode and click
· If some coordinates are computed, click ; if not, try with a more detailed address
Repeat for other locations as desired – the mashup puts all your defined locations on the map and scales it accordingly. If you have locations you do not wish to go on the map, set them to not be "in use".
2. Get the UUID of the geotagging function
· Go to General & Tools – Geotagging Mashups and click the default entity (you can create a new one but there is no benefit in having more than one, since there is only 1 set of locations on the system)
· Copy the 36-character UUID into Notepad
· Edit this into the string:
http://server/app/www.map.display.cls?uuid=475f0c2b-9f88-43b9-b1b2-f2c6965b9542&language=eng
substituting the uuid with the uuid of your location mashup, server with the server name or IP address, and app with the app name (usually "iguana")
e.g.:
http://10.4.36.29/iguana/www.map.display.cls?uuid=29378dd2-9044-11e1-ad1f-03ba8d558d00&language=eng
3. Create a widget for the map
· Go to Content-Applications – Rich Text Items and create a new widget in the normal way
· In the content area insert an iFrame with the following properties
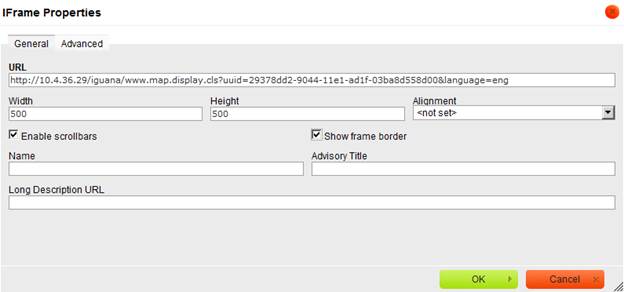
· enter the URL you have just created in Notepad
· Set the height and width and other properties if desired and click – you can use 90% in the width, if you want it to take up 90% of the column width
· Save the widget
It is possible to add various attributes to the url, for instance for a default language (&language=eng in the above example).
You can also add an attribute for the map type. The Iguana default is HYBRID, i.e.: mixed normal and satellite views, display street/road views on top of the satellite images. The others are:
ROADMAP - Displays normal street/road map.
http://nlbavwvbis2/iguana20dev/www.map.display.cls?uuid=475f0c2b-9f88-43b9-b1b2-f2c6965b9542&type=ROADMAP
TERRAIN - Display normal street/road map based on terrain information.
http://nlbavwvbis2/iguana20dev/www.map.display.cls?uuid=475f0c2b-9f88-43b9-b1b2-f2c6965b9542&type=TERRAIN
SATELLITE - Display satellite images only.
http://nlbavwvbis2/iguana20dev/www.map.display.cls?uuid=475f0c2b-9f88-43b9-b1b2-f2c6965b9542&type=SATELLITE
4. Place your widget on a page
Do this in the normal way.
Note
The mashup will always use the set of locations inherited from the database, provided they are set to be "in use" in the Iguana CMS. However, it is quite possible to present this information more than once on Iguana pages, and in differing ways, depending on the properties of each iFrame.
11 Twitter feed mashup
This section contains information on how to deal with Twitter feeds.
11.1 Twitter feed mashup definition
You can of course simply add a link to your twitter site into an RTI widget or to a header or footer or navigation entry. You can do this with a word or phrase or with an image/icon. This simply opens the page according to the parameters you give to the link, so, in the same window, new window, pop-up etc.
However if you want to display the twitter feed content detail on your page, this is done by creating a specific mashup and including it in an RTI widget using the iFrame technique. This is described in more detail here.
1. Create a new RTI item
Do this in the normal way.
2. Define the content: the iFrame
· In the content area insert an iFrame with the following properties

· The URL in the iFrame must be of the following format:
http://your_server/your_app/php/twitter.php?twitter=your_twitter_id
e.g.
http://www.waterfordcity.ie/library/iguana/php/twitter.php?twitter=WatCityLibrary
3. Add specific features as desired
· Set the height and width and other properties if desired and click .
· Scrolling = No avoids the irritating feature of finding you are scrolling the window when you wanted to scroll the page.
4. Advanced editing
You can of course view and edit the html view of the iFrame, which sould look something like this –
<iframe frameborder="1" height="380" name="Waterford City Library" scrolling="no" src="http://www.waterfordcity.ie/library/iguana/php/twitter.php?twitter=WatCityLibrary" title="Twitter Feed" width="100%" wmode="Opaque"></iframe>
You can add properties that are not in the CMS window, such as wmode="Opaque" in the above example.
5. Place your widget on the page
Do this in the normal way.
Note
Although the content is only defined once, several different widgets can contain the mashup and by varying the parameters in the iFrame they can present the content in different ways, if desired.
11.2 How to modify your Twitter feed mashup
You will realize that there is not much you can do with your Twitter iFrame, apart from set the width and height; and that if you do increase the height of the iFrame you do not seem to get any more tweets displayed – instead you just get more empty space.
There are no parameters you can pass to the URL in your iFrame to help with this.
Mostly we are limited by the API supplied by Twitter.
Having said that, the Iguana display is governed by a PHP script named twitter.php which resides on the web server in the directory iguana/css/php; and there are a couple of values set in this script which can be modified if desired.
The exact location may be different on your server; you need to add the superior directory tree.
Note
Make a backup of the file before you start!
The variable rrp governs how many tweets are shown. The default value is 4: consider changing this to 8 or 10, say.
Then, the variable height governs the height of the twitter display: this is separate from the height of the iFrame. A suitable value for this might be 500 pixels, if you have set the iFrame height to 600 pixels.
If the height variable is set too small, you will get scroll bars in the tweets display – not a bad thing necessarily, as the increased number of tweets are still there.
If you modify the script, you will of course need to reload the page showing the twitter widget, to see the changes.
If you modify the properties of the iFrame in the CMS, you will of course need to save the widget AND reload the page. You don't need to re-add the widget to the page: the new size is calculated dynamically.
Note
Make a backup of the file when you have finished! The changes you have made could possibly be overwritten in an upgrade.
Of course you are not limited to having just the iFrame in the widget. You can also have an image or some additional text or anything you like. For example, the image:
12 Cover mashup
On the back-end side (Vubis database), a logic similar to BriefCoverA/FullCoverA (see section 2.2 of the document on Mashups for an explanation) is used:
In the WebOpac parameters for Template Iguana_Full[XXX], the field for ContentA is used. The information is however not put in a template field, but in special Mashup fields at the end of the record. (See below).
On the Iguana side, there are two possibilities:
(1) DIV method: The information is treated via JavaScript functions. There are no parameters involved other than what is received via the BibSearch API.
For each provider, specific development is done.
(2) IFRAME: A call is done to a CSP that does the work.
In both cases, the resulting output is displayed in a widget on the screen.
12.1 Syntax in WebOpac template ContentA
The mashups must be defined sequentially: iguana_mashup1, iguana_mashup2, etc.
Example for the DIV's:
iguana_mashup1= Author Notes^^syn_anotes^http://plus.syndetics.com/widget.php?id=cnib
iguana_mashup2=SyndeticsPlus^^Summary^syn_summary^http://plus.syndetics.com/widget.php?id=cnib
Example for the IFRAME's:
iguana_mashup1=Electre Summary^../IguanaMashup.csp?Query=2.12345&MashupName=Electre&MashupType=Content&Template=Iguana_FullUuiMarc/B& Language=fre
So iguana_mashupN has 2 (IFrame) or 4 parameters separated by ^:
1 Text field
2 CSP [IFRAME only]
3 DIV ID [DIV only]
4 JavaScript [DIV only]
12.2 BibSearch API: Example of Mashup of type DIV
This example is for Syndetics at CNIB:
http://www.cniblibrary.ca/iguana/www.main.cls?sUrl=search#recordId=1.10218046
(scroll down; everything starting from Author Notes is coming from Syndetics)
This is sent in the BibSearch API:
Mashups><Mashup><MashupText>Mashup SyndeticsPlus</MashupText>
<MashupType>div</MashupType>
<DivId>syn_anotes</DivId>
<Script>http://plus.syndetics.com/widget.php?id=cnib</Script>
</Mashup>
<Mashup><MashupText>Mashup SyndeticsPlus</MashupText>
<MashupType>div</MashupType>
<DivId>syn_dbchapter</DivId>
<Script>http://plus.syndetics.com/widget.php?id=cnib</Script>
</Mashup>
…
12.3 BibSearch API: Example of Mashup of type IFRAME
<FullMashups>
<Mashup>
<MashupText>Sommaire (Electre)</MashupText>
<IframeSrc>
../IguanaMashup.csp?Query=2.12345&MashupName=Electre&MashupType=Content&Template=Iguana_FullUuiMarc/B& Language=fre
</IframeSrc>
</Mashup>
</FullMashups>
So for each mashup, there are two fields:
<MashupText> = To be displayed in widget top bar.
<IframeSrc> = IFRAME SRC parameter
13 How to configure AddThis for Iguana
AddThis is a web technology company based in the USA. The company operates AddThis.com, a widely used social bookmarking service that can be integrated into a website with the use of a web widget. Once the widget is added, visitors to the website can bookmark an item using a variety of services. This chapter describes how you can offer AddThis via your Iguana website.
You need to have an AddThis account for this feature.
13.1 AddThis settings
After logging in to your AddThis account, go the “Settings” menu:

On this page open the “Profiles” section:

From now on in this document, it is assumed that the profile one wishes to modify is ‘My Profile' with profile ID‘ab-1234567890'. If there is only 1 profile, ‘My Profile' is used, if there are multiple profiles, the correct one must be selected.
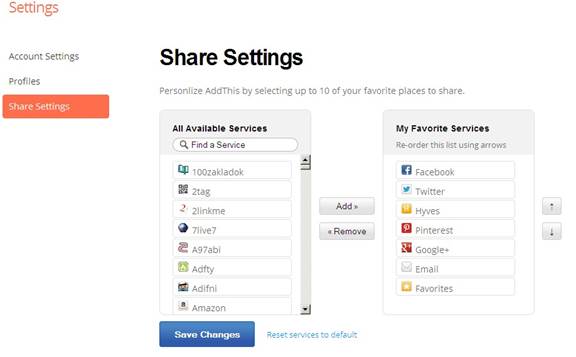
To set “My Favorite Services” you will need to go to ‘Share Settings':

Here one can choose (maximum) 10 favourite services, which are shown in the element “Sharing” in Iguana. This is done by searching for the correct service in the left column, selecting it and adding it to the right column with the button “Add >'. If one wants to remove a service from the right column, select it and click ‘< Remove'. The order can be changed, using the arrow buttons on the right side.
A possible list of Favorite Services:
If less than 10 services are set, this will be completed by AddThis. Also, the option ‘More…' will be displayed at all times, through which you can request the full list of services..
NOTE! This favourites list is only 1 of the factors that determine the eventual list of displayed services in the popup “Sharing”. Other factors are, amongst others: country of visit, previously known sharing behaviour of the visitor, browser/platform of the visitor. This behaviour can not be influenced by Iguana en is determined by AddThis itself. The eventually displayed list of services can be different for each visitor.
Email template
One of the services offered by AddThis is the service ‘Email'. With this an email can be sent directly from the “Sharing” popup. De layout of the email is defined by an email template. AddThis offers a standard template, which can not be modified and also the option to create additional templates and to set which template to use. In general, one will want to make use of that option.
To set this, one has to open the profile by selecting ‘My Profile' in the profiles section (or a different one if there is more than one profile):

Scroll down to the section ‘Email Templates':
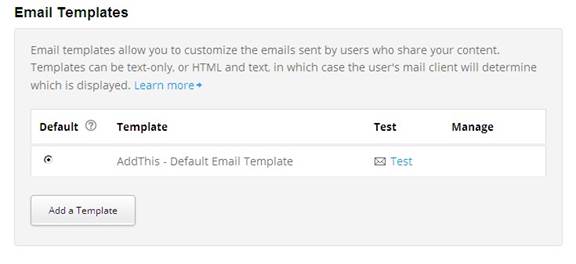
A new template can be created by clicking ‘Add a Template':

On the page the content of a new email template can be defined. With these templates AddThis uses tokens with which it can dynamically place information in the template. The possible values and their meaning are explained on the right side of the screen. Iguana does not support the use of so called ‘custom variables'.
The value of ‘Template name' has to be a unique text without the use of spaces. Use underscores (_) to replace a space if desired. This is the name that will be displayed in the overview of email templates.
The value of ‘Subject' is the subject of the email that will be sent. In here you can use the aforementioned tokens.
The ‘Text-only Content' must always be defined. This is the content of the eventual email. In here the aforementioned tokens can also be used.
It is also possible to send an email with HTML content, which can be set in the ‘HTML Content' tab. There is, however, no editor visible, so knowledge of HTML is required.
A (Dutch) template could be as followed:
The modified template is saved by clicking ‘Save Template'. After saving one is sent back to the profile screen and the new email template appears in the list.
To use the new email template it has to be set as default. This can be done by selecting the radio button for this template. You will be prompted for confirmation:

The button ‘Make Default' sets the selected email template as default and the button ‘Cancel' cancels this. After setting the new email template as default you will see confirmation in the list:

By clicking ‘Edit' next to an email template one can modify this email template again, by clicking ‘Delete' next to it one can remove this email template. AddThis's own email template can not be modified nor removed.
To try out an email template, click ‘Test' directly next to it. A window pops up where one can enter the email address to which the test email, with the to be tested email template, will be sent:

13.2 Iguana settings
After all this is set, the AddThis profile id must be set in Iguana, so that the “Sharing” option in Iguana can make use of it.
In the CMS under Parameters – Parameter setup – General settings – System settings – Advanced options you can define the following (these are either set system wide or for a specific profile):
User code for ‘addthis': AddThis user code if library has an AddThis account to customize the AddThis display.
Pages that can contain ‘addthis': Selection of pages for which the ‘addthis' functionality can be used.
In the CMS under Parameters – Parameter setup – Search – Title display you can activate “share” under the Valid options:

If “share” is not activated, it means AddThis will not be available on the title page. This is either at system level, site profile level or location profile level.
14 How to configure a ‘report this' link
There is an option to add a "Report this" link to reviews to report bad use.
Sites will have to customize this particular piece of data which is on the reviews, including a link to report this to the library.
Sequence of steps
On the main screen of the CMS, choose General & Tools, then choose System texts.
Search for ‘reportbaduse'.
Under Local text you can define the required mailto link, based on the example in the System text (e.g. <a href="mailto:baduse@mylibrary.com">Report bad use</a>)
The example would look like this on the Iguana front end: Report bad use.
Note
These merely opens the email that can be sent with the email address in the To field. It does not pass any data into the body of the email.
15 How to place Iguana animations in a non-Iguana site
It is possible to place an animation defined in Iguana on an external site. This means the animation will be placed in an iframe in a Rolodex, irrespective of the original animation type in Iguana.
Setup
There is a test page for the definition of the Rolodex widget, which can be found at http://{domain}/iguana/IFW.RolodexTest.cls, where {domain} means the domain where Iguana runs. This will show the animations defined in the Iguana CMS that can be used to display as external Rolodex animation. After selection from the dropdown list, the Rolodex animation is loaded with the corresponding cover data and the animation is displayed. Directly underneath the animation the iframe URL is displayed that must be used for the iframe settings, as well as the URL that can be used to show the Rolodex animation in iGoogle or other OpenSocial websites.
Recommended iframe settings
The recommended settings for an iframe that can be placed on an external site are 250px wide and 300px - 400px high. In case you need to define an iframe manually on the external site, you can use this example::
<iframe
 width="250"
height="300"
id="rolodex"
name="rolodex"
scrolling="no" src
="url
"></iframe
>
Where url is the URL determined under Setup above.
Example:
The animation ‘test animation' is selected, with UUID in the CMS a089eb6f-afd1-4db0-912f-6fad4ea6de66. This is displayed and underneath it the URL http://{domain} /iguana/IFW.Rolodex.cls?fi=a089eb6f-afd1-4db0-912f-6fad4ea6de66.
The iframe defined looks like this:
<iframe
 width="250"
height="300"
id="rolodex"
name="rolodex"
scrolling="no" src
="http://{domain}/iguana/IFW.Rolodex.cls?fi=a089eb6f-afd1-4db0-912f-6fad4ea6de66 "
></iframe>
16 Online payments via Iguana
Online payments are set up and activated via V-smart server parameters (AFO 497). The Iguana website will offer an option to pay outstanding payments in the user activities if this option is activated.
Payments can be used from:
· Payments due (on the My profile page)
· Online enrolment
· Increase deposit (on the My profile page)
Note
When online payment is enabled, the borrower cannot choose to pay for anything from a deposit. It is only possible to top up the deposit amount online.
Texts related to payments can be modified via Iguana CMS > General & Tools > System texts > filter the display on “ID Contains pay”.
Texts related to deposits can be modified via Iguana CMS > General & Tools > System texts > filter the display on “Module Contains deposit”.
The Iguana website will call the standard server functionality for online payments.
16.1 Online payments for enrolment
For online guest registration an online payment page can be included – this option needs to be activated in the Iguana CMS.
This section explains the steps required for setting up online payment for membership fee.
Sequence of steps
Go to AFO 497
· Select Financial groups
- Set up the information for your payment provider. Infor currently supports: Bucksnet, Ogone, iDeal, Capita, WPM.
· Next, select Financial group for current location
- Ensure this is linked to the settings for your payment provider for all locations that offer online payment
In the Iguana CMS
· Choose Parameters – Parameter settings – User activities – Logon and logoff, and set the parameter Online registration allowed to Yes.
· Choose Parameters – Parameter settings – User activities – Registration: and set the parameter Include payment to Yes.
· Choose Parameters – Parameter settings – User activities – General settings; Ensure that under Valid options Payment history is one of the options selected
16.2 Online payments for charges
This section explains the steps required for setting up online payment for other charges such as reservation fees, fines, article sales, replacement costs.
If payment for membership fee is NOT part of online registration, membership fee can also be paid from this function.
Sequence of steps
Go to AFO 497
· Select Financial groups
- Set up the information for your payment provider. Infor currently supports: Bucksnet, Ogone, iDeal, Capita, WPM.
· Next, select Financial group for current location
- Ensure this is linked to the settings for your payment provider for all locations that offer online payment
In the Iguana CMS
· Choose Parameters – Parameter settings – User activities – Outstanding payments and set Allow online payment to Yes.
· Choose Parameters – Parameter settings – User activities – General settings and select Payments due under Valid options.
· Choose Parameters – Parameter settings – User activities – General settings: ensure that under Valid options Payment history is one of the options selected
16.3 Online payments into deposit
This section explains the steps required for setting up the possibility to add money to a deposit online.
Sequence of steps
Go to AFO 497
· Select Financial groups
- Set up the information for your payment provider. Infor currently supports: Bucksnet, Ogone, iDeal, Capita, WPM.
· Next, select Financial group for current location
- Ensure this is linked to the settings for your payment provider for all locations that offer online payment
Go to AFO 481
· Select Deposits
- Select Deposit codes and set up the required code(s)
- Select Business rules and define them
- Select Valid payment types and define them
In the Iguana CMS
· Choose Parameters – Parameter settings – User activities – Outstanding payments and set Allow online payment to Yes.
· Choose Parameters – Parameter settings – User activities – General settings and select Deposits under Valid options.
· Choose Parameters – Parameter settings – User activities – General settings: ensure that under Valid options Payment history is one of the options selected
17 The use of savelists in Iguana
Typical examples of using a savelist are for New Titles, titles available for Book Groups, or to promote a part of the collection.
You can provide a URL on any page to access the savelist and publish a results page of those titles. Note that the savelist must be derived from AFO 141, where the Publish to web option has been invoked.
The URL can be rendered as a link on the page. For example you can include the URL within an RTI box:

In Iguana this displays as:
The general syntax for invoking a savelist via a URL is follows:
…/www.main.cls?sUrl=search#savelist=General_*_SAVELIST
You can optionally specify a title and/or template in the URL parameters. This is done via the &title= and &template= URL parameters.
The default page title is derived from General & Tools – System texts – Reading lists. You can change that but if you want to use more than one savelist, or you are using Reading Lists as well, then you should use the &title= parameter in the URL:
For example:
…/www.main.cls?sUrl=search#savelist=General_*_SAVELIST&title=Bristol Books

By default the readinglist title and template will be used.
Note
If you do not have Reading Lists set up on your system please contact Infor to check that the system is not referencing the Reading Lists database.
Infor suggests that you create a savelist template, by copying the readinglist template, and explicitly include it in the URL e.g.
…/www.main.cls?sUrl=search#savelist=General_*_SAVELIST&template=savelist
18 How to add animations
You need to know, for the type of animation you are creating, the parameters required. These can vary according to the type of animation, so we recommend you look at the full documentation before you start, i.e. the document on Applications: chapter 5, Animations.
Sequence of steps
On the main screen of the CMS, select Content-Applications, then choose Animations.
Click the button.

· In Basic Settings, Tree Storage, enter the folder/structure in which you want to save the item. The name of the top level folder goes in 1, the next level folder in 2, and so on. Remember, the animation will be placed in the Featured Items folder (Featured Items is the older term for Animations), at the very top level by default, and you are naming the levels below this, so you don't need to create a folder called Animations in other words. Infor strongly recommends defining a naming convention for these folders before you start.
· In Basic Settings, give the item a name – this is only shown in the CMS.
· In Basic Settings, give the item a title to display on the Iguana page.
· In Basic Settings, set the Type of the animation, for example Recently Viewed.
· In Basic Settings, what you put in the ID will vary according to the Type. For example if you chose Savelist as the Type, the ID will contain a list of savelists. For some types, it can only be "*".
· In Basic Settings, select the presentation of the animation.
· In Advanced Settings, set the number of days to go back to, say, 99 initially. You can change this later if needed.
Click , then . After you have clicked , the animation should be visible in the Preview section of the CMS page.
Optional Features
In Advanced Settings, set the background image for the animation. The image will be tiled if it is too small for the page.
In Basic Settings, set the scope.
In Advanced Settings, set the animation to be used with personal interest profiles.
In Advanced Settings, set the number of embargo days.
In Advanced Settings, set the maximum number of records. If this is too large, the animation takes longer to display. If it is too small, you do not get a meaningful river.
In Advanced Settings, set Cover Presence Check and Hide Dummy Cover.
In Permissions and Restrictions, set a date range for when the item should be displayed.
In Permissions and Restrictions, set the flag to determine whether the item should only be displayed to logged in users.
Some peculiarities to be aware of
Animations may be displayed by Flash or JavaScript. However, this is not a property of the animation, just of the instance of the animation, either in a preview window, or on a page – you have to check a radio button, in each case, to specify.
In Iguana 2.0 though, there is no JavaScript version of carousel or rolodex. If you attempt to view those animations in JavaScript, they will display as a book river. This can be disconcerting, if you are previewing an animation you have just created.
This means that a carousel or rolodex animation will come out as a book river on the iPad.
For the data sources Picture List and XML File however, you *must* display them as JavaScript.
Using the animation
You need to put the item on a page for users to see it. Please see Chapter 3 (Pages) above, if you need to revise the steps needed to do this.
You can use any animation in any part of a page. However, in practice, book rivers do not look very nice in a narrow column, and carousel and rolodex can look a bit odd when displayed in the full width of the page.
18.1 Animations from savelists
You can use a savelist to import animations. Steps:
· Go to Content –applications: Animations
· Select the right Animations definition (or create a new one)
· Under Type select Savelist from the dropdown list
· Under ID you can now select a specific user from the dropdown list
· Once you have selected a specific user, the field ID will show all bibliographic savelists of that user
· Now select the required savelist from the dropdown list
Note
When you import entries for animations via a savelist, the system does apply the ‘backdate' parameter (Number of days to go back under the Advanced settings for the animation). To be safe, it is best to set this parameter to cover the period dating back to your original Vubis installation to be sure of getting all the items from the savelist displayed in Iguana's animations.
19 How to add word clouds
Remember the Iguana word cloud looks like a Wikipedia word cloud, rather than an Aquabrowser word cloud.
Sequence of steps
On the main screen of the CMS, choose Content-Applications, then choose Word Cloud.
Click the button.

In Basic Settings, Tree Storage, enter the folder/structure in which you want to save the word cloud. The name of the top level folder goes in 1, the next level folder in 2, and so on. Remember, the word cloud will be placed in the Word Clouds folder at the very top level by default, and you are naming the levels below this, so you don't need to create a folder called Word Clouds in other words. Infor strongly recommends defining a naming convention for these folders before you start.
In Basic Settings, give the word cloud a title to display on the Iguana page.
In Items, click . A small window opens for the new item.

In the Item window, give the item a Title. The final word cloud will be a collage of all the titles created. The order in which you create your items does not matter, they will be rearranged at the point of display. They are displayed in a constantly changing random order.
In the Item window, set the Type, which determines the function of the item: Link (to an external URL), search (the catalogue) or open (another Iguana page).
In the Item window, set the Ranking, where 1 is the most "important", and 10 the least – the most important items are displayed in larger font.
In the Item window, set the Term to be the search term (for Search), or target page (for Link or Open). For Link you need the full URL. For Open it can be in the format
(basically anything beginning with www.main.cls).
Click , then . After you have clicked , the word cloud should be visible in the Preview section of the CMS page.
Optional Features
In the Item window, set the start and end dates for the display of the item. Optionally, check the Yearly box, if the same item should be shown on the same dates every year. Note this is for the Item, not the word cloud itself.
In Basic Settings, add keywords to be used by the site search function.
In Permissions and Restrictions, set a date range for when the word cloud should be displayed.
In Permissions and Restrictions, set the flag to determine whether the word cloud should only be displayed to logged in users.
Using the word cloud
You need to put the word cloud on a page for users to see it. Please see Chapter 3 (Pages) above, if you need to revise the steps needed to do this.
20 How to set up search trees
The search tree structure is created in the WebOpac Preferences and merely referenced in Iguana. You can display a search tree page on an Iguana page on its own, or you can display it in a widget, so it can be accompanied by other content on a page – however you can only put one such widget on an Iguana page. You need to know the name of the tree, and the component pages, which you can get from Preferences.
Sequence of steps to display the tree on a page
You can link to the tree from a text or an image anywhere you can use the rich text editor functionality – in practice this means within a header, footer or widget – or from an item in a navigation.
This example assumes an existing widget, if you do not have one create a new one in the normal way.
In the CMS, click Content-Applications, and then click Rich Text Items.
Click to open the widget from where you want to link to the search tree page.

In the content section, highlight the text or image where you want to place the link and click the Link icon in the rich text editor.
Enter the URL in the format:
server_name/iguana/www.main.cls?surl=search#app=Tree&treeId=tree_name&pageId=page_name
Insert your own server_name, tree_name and page_name and respect the capitals and lower case letters as indicated.
Optionally, in the Target tab of the Edit Link information, set the page to display as a pop-up window, or in another format as desired.
Click and save the widget.
The widget is now ready for use.
Sequence of steps to display the tree in its own widget
The widget is implemented as a Direct Search widget.
In the CMS, click Content-Applications, and then click Direct Search and Search Filters.
Click the button.
In Basic Settings, enter the Search URL in the format *
server_name/iguana/www.main.cls?surl=search#app=Tree&treeId=tree_name&pageId=page_name
Insert your own server_name, tree_name and page_name and respect the capitals and lower case letters as indicated.
In Tree Storage, enter the folder/structure in which you want to save the item. The name of the top level folder goes in 1, the next level folder in 2, and so on. The widget will be placed in the SearchApp folder at the very top level by default, and you are naming the levels below this, so you don't need to create a folder called Search in other words. Infor strongly recommends defining a naming convention for these folders before you start.
In the Title slot, enter a title you wish to be displayed as the title of the widget.
Save the widget.
The widget is now ready for use.
21 How to set up a feedback form
It is possible to allow the user one or more methods to send feedback to the library.
You can define this via a Page with an application based on specific templates for this purpose. The standard form looks like this:

Note
The options actually available on this form depend on AFO 482 – Contact management parameters – Types. Only types where the parameter Do not display in Iguana is OFF, are shown. The labels next to the radio buttons come from the Wording field of the Type definition.
Sequence of steps
In the CMS, click Content-Applications, and then click Rich text items.
Click the button.

In Basic Settings, Tree Storage, enter the folder/structure in which you want to save the item. Give the item a Title to display on the Iguana page.
Go to the Content section:
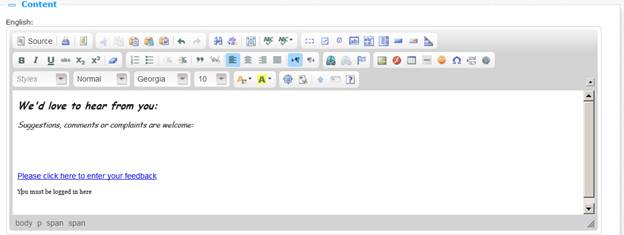
Add explanatory text. Select a particular sentence from this text and click Link (this will be the hyperlink on the page):

· Link type must be set to URL
· Protocol must be set to <other>
· URL must be javascript:CRM.start();
This particular JavaScript determines both the form with the radio buttons and the subsequent form where the customer can enter text.
Click , then .
In Pages & Profiles determine on which Page(s) you want this application to appear.
Optional Features
The feedback form is supplied with a standard image: img/custom/crmcontact.jpg. You can change this in the template formText. Or you can replace the default image in the appropriate folder.
You can modify the standard wording and texts under General & Tools, System texts. Filter on Module contains “CRM”.
You can modify the form contents under Structure & Style, Templates. Filter on Category contains “CRM”.
22. How to export savelist with search results
It is possible to allow users to send their search results to themselves via email.
There is a parameter in Parameters– Parameter setup – Search – General settings: Allow use of email options by not-logged on users. This determines whether or not users can send search results by email even though they are not logged on to the system.
Workflow
A user would proceed as follows in the Iguana website:
· Type in search term(s)
· Select entry(s)
· Click on Add selection to temporary list
· Click on View temporary list
· Click on Send by email to get this popup :
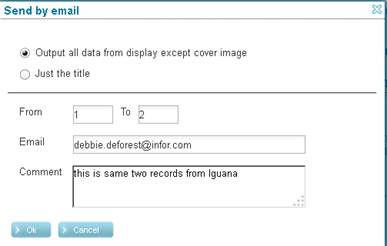
Required settings
The user will get an email with subject “Reading list” and the bibliographic information in the body of the email. The fields and subfields included are dependent on two things:
· If you choose “Output all data from display except cover image” then the CMS template – readinglistemaillong – is used AND the elements fields/subfields are dictated by the preferences template “Iguana_Brief{format}” (i.e. Iguana_BriefMARC21/B).
· If you choose “Just the title” then the CMS template – readinglistemailshort - is used AND again the preferences template “Iguana_Brief{format}” elements are used.
Make sure that you keep the following CMS templates pairings in sync, because the first one is used if users select the “Add selection to temporary list” and the other is used if users just click the “Send by email” directly from the first Search results screen – that is IF you want the user to receive the same bib output for either command sequence:
· readinglistemaillong AND resultslistemaillong
· readinglistemailshort AND resultslistemailshort
Iguana only uses the two preferences templates “Iguana_Brief{format}” and “Iguana_Full{format}”– you can't create a separate template for exporting data. You could add more fields/subfields to the existing elements in the Iguana_Briefxxx template though. However, that template is also used to control what is displayed on your Iguana search results screen, so if you change the element(s) content (for example the BriefTitle element) AND the CMS template “resultslist” uses those elements then you are changing your search results screen too. If you don't want that to happen then there's a way to get around this:
1. In preferences, create new element(s) in the Iguana_Brief{format} template, setup the fields/subfields that are to be extracted for these new element(s) and give them unique names – like BriefExportTitle. Once you've added all of the elements, remember to move those new names over to the right window in the Order of elements by full description section, so that Iguana will use them, and click Save:

2. In CMS – Structure & Style – Templates, set your filter and modify the Local contents section for these templates to use the new element names (example shown below):


23 Reservations. Enable use of dropdown list instead of radio buttons
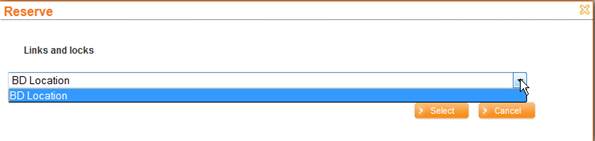
If a user is allowed to select a reservation location, the default display for selection in Iguana is with radio buttons. You can however also create a dropdown list.
This feature is controlled by parameter settings in WebOpac Preferences - User activities - Reserve section:

as well as in the Iguana base.css file.
If the WebOpac Preferences are set so that the borrower can select one or more reservation locations, like this

Iguana presents a checkbox thus
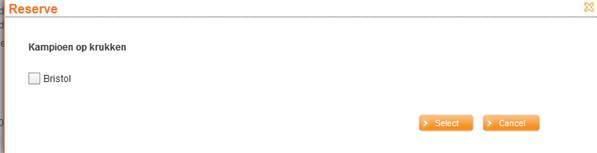
If the top value is changed, to limit to one reservation location:

then a setting in the Iguana base.css file determines whether radio buttons or a dropdown list is displayed.
Set like this:
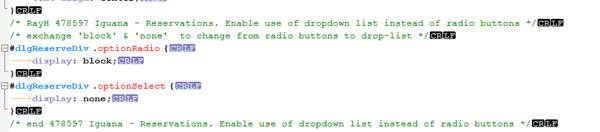
radio buttons for each available options will be displayed:

Alternatively to see a dropdown list instead:

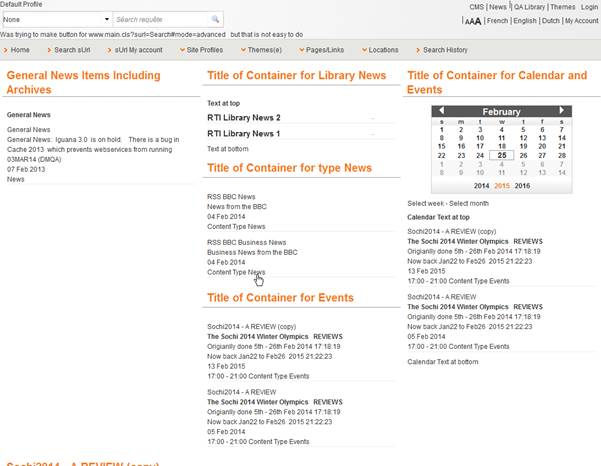
24 Content type title to be returned for list of items in publish container
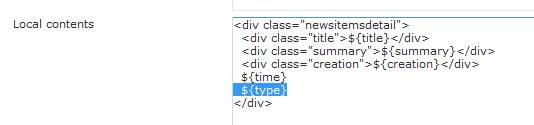
When the list of items in a Publish container is requested, it is practical to have the title of each item's associated content type available. This can be done with the token ${type}, which can be added to the item template (newsitemdetail / summarythumb / summarynarrow / summarybigdate), which will be used to display the title of the content type a publish item is associated with.
Example, WITHOUT this setting:
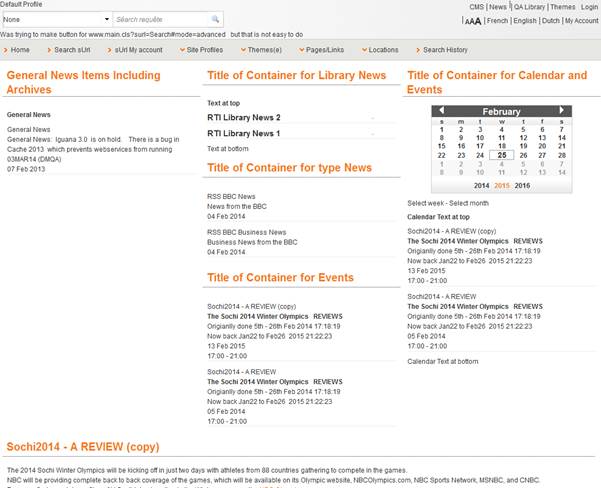
Add the token, in this case to newsitemdetail:

Result, 2* Content type News & 4 * Content Type Events are visible
25 Published content calendar – tip
A tip on how to highlight the selected date within a Calendar. Normally a calendar displays like this and you cannot tell that you have clicked on a particular date:

If you want some visual feedback like this:

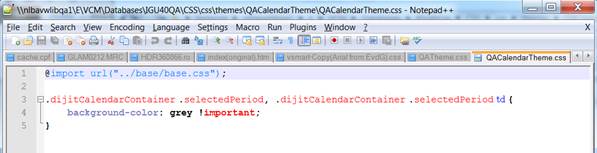
Then you have to change the css definition. It is handled via a CSS class, so the library can use this in their own CSS theme. It is not part of base.css.
It basically extends base.css with only the 'selectedPeriod' rules for giving the selected day (and week) a grey background. But it is up to the library to implement this, based on their wishes/design. I.e. you can use a background colour that fits with your own colour scheme. The notation is:
· Document control - Change History
|
Version |
Date |
Change description |
Author |
|
0.1 |
2012 |
Creation of various documents with tips |
Phil Jenkins |
|
1.0 |
January 2013 |
New document |
|
|
1.1 |
August 2014 |
More on AddThis configuration; more on animations from savelists; new chapter on Feedback form |
|
|
2.0 |
April 2016 |
More on Published content; revised chapter on Online payments; new chapters on Export search results, Reservations dropdown list, Return content type title, Calendar tip |
|